Introduction
Welcome to the AlertHub application documentation. This guide will help you integrate our API-based event hub into your infrastructure.
You can input events via a simple API call or schedule them, and the hub will process them in real-time. Depending on your configuration, events can trigger an email, mobile app pop-up, WhatsApp notification, or an upstream webhook request.
Your dashboard will always update in real-time!
Basic usage
To see all API methods please query /api/
A Swagger style page will allow you to authenticate and try the API operations before integrating with your application.
Authentication
Authenticated API requests require a token included using the X-API-KEY header of your HTTP request.
X-API-KEY: YOUR_EVENTS_API_KEY To get you API key login into your profile and select "API Keys" menu option. Then generate your API key giving a description.
IMPORTANT: Once the API key is generated, you won't be able to see it again, so save it somewhere safe.
To verify which API key on the web interface is the correspondent to the key value you have you need to calculate the SHA256 hash of the text. On a Linux system you can verify it using the following:
$echo -n 'alerthub_xxxxxxxxxxxxxxxxxxxxxxxxxxxxxxxxxxxxxxxxxxx' | sha256sum
59b85634ef70b49c01f3673a211b277978d3f8c7dd9160e82e0e764ecdf9811c
If you would like to revoke an API, access your profile page and under "API Keys" menu item you will see all the API keys generated.
Using the description or the hash identify the API key and click on trash icon to delete it. Confirm the action.
Event ingestion
To send an event to the hub, make a POST request to the event endpoint followed by your user ID.
The user ID value is shown in your profile under the Account menu option.
POST /api/event/[user_id]
Content-Type: application/json
X-API-KEY: [your_api_key]

{
  "title":"Simple notification",
  "body":"Simple notification example with Title and Body"
}
Replace [user_id] with your user ID and [your_api_key] with your API key
If no notification profiles are specified the profile "default" will be used which contains email and push notification.
Note: Requests without the 'Content-type' header set to "application/json" will be rejected.
Examples from popular source codes:
curl -X POST https://alerthub.io/api/event/YOUR_USER_ID \
  -H "X-API-KEY: YOUR_API_KEY" \
  -H "Content-Type: application/json" \
  -d '{
    "title": "deploy_failed",
    "body": "Production node-3 degraded",
    "profile": "mail_only"
  }'
package main
import (
"bytes"
"net/http"
)
func main() {
payload := []byte(`{
"title": "deploy_failed",
"body": "Production node-3 degraded",
"profile": "email_only"
}`)
userID := "YOUR_USER_ID"
req, _ := http.NewRequest("POST", "https://alerthub.io/api/event/"+userID, bytes.NewBuffer(payload))
req.Header.Set("X-API-KEY", "YOUR_API_KEY")
req.Header.Set("Content-Type", "application/json")
resp, err := http.DefaultClient.Do(req)
if err == nil {
defer resp.Body.Close()
}
}import requests
requests.post(
"https://alerthub.io/api/event/YOUR_USER_ID",
headers={"X-API-KEY": "YOUR_API_KEY"},
json={
"title": "deploy_failed",
"body": "Production node-3 degraded",
"profile": "email_only"
},
timeout=5
)await fetch("https://alerthub.io/api/event/YOUR_USER_ID", {
method: "POST",
headers: {
"X-API-KEY": "YOUR_API_KEY",
"Content-Type": "application/json"
},
body: JSON.stringify({
title: "deploy_failed",
body: "Production node-3 degraded",
profile: "email_only"
})
});# Ping AlertHub every 15 minutes or trigger if a backup script fails
*/15 * * * * /usr/local/bin/backup.sh || curl -fsS -m 5 -X POST https://alerthub.io/api/events/YOUR_USER_ID -H "X-API-KEY: YOUR_API_KEY" -H "Content-Type: application/json" -d '{"title":"cron_failure","body":"Nightly backup failed","profile":"email_only"}' > /dev/null 2>&1Define profile
There are four standard profiles created:
- default - email and push notification. Used if no profile is specified
- email_only - only email is used for notification
- mobile_push_only - only push notification is used. If you do not have a mobile device registered, you won't get any notification.
- whatsapp_only - only whatsapp message is used for notification
These cannot be modified or renamed.
Custom profiles can be created using the "Notification" menu under the user's profile.
To select a profile please use the following parameter:
POST /api/event/[user_id]
Content-Type: application/json

{
  "title":"Simple notification",
  "body":"Simple notification example with Title and Body",
  "profile": "custom23"
}
Where "custom23" is the profile name created by the user.
Event attributes
Other attributes can be added to the event at creation.
Such as:
- source - Defines the source of the event. Ex: server1
- severity - Severity of an event. Ex: warning
- priority - Priority of an event. Ex: medium,1
- status - Status of an event. Ex: in progress, closed
These are limited to 250 characters and require at least one character to be created.
If you would like to add a custom attribute to your events that doesn't exist, please contact us.
Example request body:
[...]
{
  "title":"New customer",
  "body":"A new customer signup for your service.",
  "profile": "custom23",
  "source":"zion57",
  "severity":"medium",
  "priority":"high",
  "status":"no payment account added"
}
Get events
This endpoint requires authentication. It returns the events the users events for the authenticated user.
GET /api/eventsThere are two parameters that can be passed to the endpoint
startIndex and count
count defines how many records to return and if not specified will be set to 10, startIndex defines what index to get and if not specified defaults to 1. This means that is no parameters are specified the API will return the first 10 records order by creation time, more recent first.
count needs to be positive,startIndex needs to be 1 or above.
Example request:
GET /api/events?count=50&startIndex=5 HTTP/2Example answer:
HTTP/1.1 200 OK
Content-Type: application/json
X-Request-Id: 1790599950164973368
Date: Mon, 28 Sep 2026 12:52:30 GMT
Transfer-Encoding: chunked

{"pagination":{"index":5,"count":50,"total_records":573,"total_pages":12,"has_next":true,"has_prev":true},"data":[...]}
The event data will appear under the data key and pagination key will provide information regarding the number of records, pages and whether there is a next/previous page to request.
Get event by ID
This endpoint requires authentication. It returns additional information for a particular event for the authenticated user.
GET /api/event/[event_id]Example answer:
HTTP/1.1 200 OK
Content-Type: application/json
X-Request-Id: 1791203987527809209
Date: Mon, 05 Oct 2026 12:39:47 GMT
Content-Length: 239

{"id":"d3ikqgooaiihm5iq1oq0","title":"Bonkers one!","body":"Oh yeah","userId":"d2s3dnooaiit8bt6ndcg","profile":"default","time":"2025-10-07T17:26:27.935516Z","sourcemetadata":{"source":"via API","ip":"0.0.0.0/32","agent":"curl/7.81.0"}}
Delete event
To delete an event using the API you can make a request using the DELETE method to the event endpoint followed by the event ID (in the path).
To retrieve the event ID value, either use the GET /api/events endpoint or click on the event in the dashboard and under the event details there will be the Event ID field.
DELETE /api/event/[event_id]View scheduled events
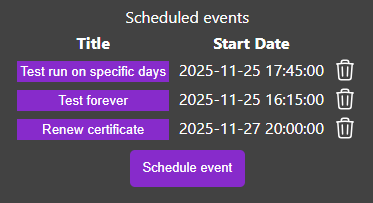
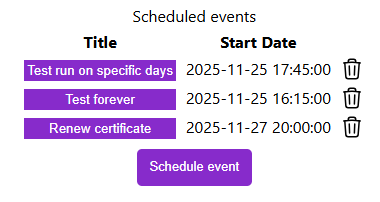
To view schedule events, navigate to Profile and select the Schedule menu option.
Scheduled events will appear with the defined Title and Start Date.
Scheduling an event
To view details of the event and schedule, click on top of the title field of the event. A window will show all the details of the scheduled event. Click OK to close the window and return to the scheduled events list
To schedule events, navigate to Profile and select the Schedule menu option.
Click on "Schedule event" button. A form will appear
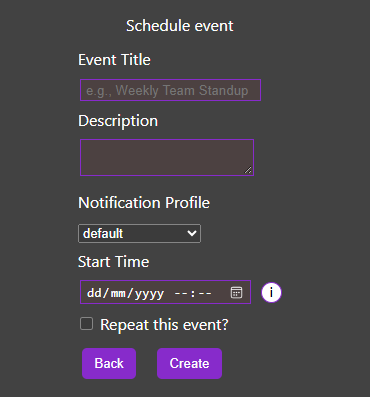
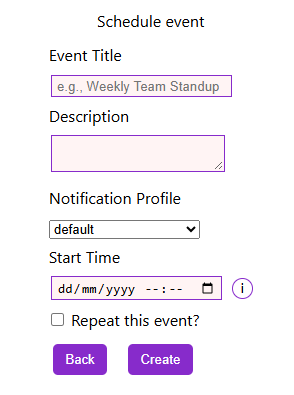
Fill the form with the following:
- Event Title - Title for the event. It will be used for the notification itself. (Required)
- Description - Body of the event, what do you need to remember or take action. (Required)
- Notification Profile - What type of notification you would like for this scheduled event
- Start Time - When would you like for it to occur. For repeated events, when does it start.
- Repeat this event? - Checkbox to enable recurrent events. Ex: weekly, monthly, etc.. When selecting this option a new section will appear.
Once the form is completed, please press Create to create a new event or Back to Cancel and return to schedules window.
Delete scheduled events
To delete a scheduled event, navigate to Profile and select the Schedule menu option.
The list of scheduled event will appear. Please review the details of the event by clicking on the title of the event.
Once confirmed the correct event to delete, press the trash icon on the right of the event from the events list. A confirmation dialog will appear to confirm the action. Choose Cancel to cancel and return to previous window or Delete to proceed with the deletion.